Followers

23 May 2012

Wellington Bear

Wellington Bear

This is a bear that can be used for many different
age groups, male or female cards.  There is
such a variety of situations/backgrounds etc that this
bear has posed in.

This first card has been made using this months goody bag
from DO Crafts.  Linen papers, sentiments, brads, 
paper flowers, ribbon and decoupage sheet.

The only additiion was using some inks
to the edges to give an aged distress look.


Jigsaw Gift and Card

I had great fun with this card as infact it really is
quite simple to make once I had the main
idea in my head!!

I used Wellington Designstax 12 x 12 paper to
back the card, sentiment, mat and layered.

Photo corners to hold the acetate in place which
in turn is holding the jigsaw in place, whilst still
allowing the receiver to use the jigsaw by slipping
it out of its cover.

A couple of the stickers to the sides for added
interest and a piece of organza ribbon.

The JIGSAW - was stamped using two stamps
from the 8 x 8 stamp set with versafine inkpad.
I then coloured Wellington with watercolour
pencils, which gave a nice aged look.


A Card for Dad

This card was made using a card kit, but changing the
insert/backing paper, using a piece of ribbon, buttons and
a sticky tag makes the card completely different to
everybody else.

21 May 2012

Harbour side

Michael Powell designs

The first two cards shown here are from a
tall card kit which consist of one card blank
and enough decoupage to complete
the card - but that is not all
there is enough toppers etc to make many more
cards, I would estimate at least another 5 cards easily.


Having fun using up bits and pieces!

15 May 2012

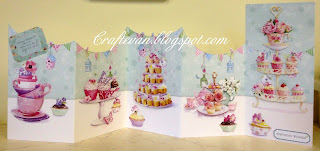
Cupcakes Galore

Lucy Cromwell designs

These cards are from a Do Crafts kit and come with an
array of goodies for you to embellish with.


You cannot go wrong with these the cards fold fairly flat
depending on how much depth you put on your
decoupage/embellishments.


I have used clear glaze, decoupage, extra cupcake
toppers and sentiments.


14 May 2012

Molly Bloom

Molly Bloom stamps and pro markers

Had the best time meeting Claire Rowlands in
Weston Supermare the other weekend.  For those
of you who do not know of Claire she is the
designer of Molly Bloom Stamps.

The two cards below are the cards made on
the day with Claire.  She has the most imaginative
mind and really uses some great items, some of which
you may find in your own homes, garages etc and never
thought of using on a card before - rusty wire being one!

There is a lot of work in these cards, but the end result
I feel is really worth it.

Since going to the workshop I have made many more on
a varying theme of these, which I shall post at some point,
mainly when time prevails.

If you do not think you can use a stamp, try these stamps
as each one is very deeply etched, so give outstanding
results every time.


Happy Crafting!

Typography stamp

This card was made using Papermania typography stamp
'Son' and '1'
Using the goody bag this month from DOcrafts
and Wellington papers mat and layer as required.
Stamp the word son three times on different
papers and cut out a letter from each paper
to make the word son.  Doing the same
thing again with the number '1' stamped only
once cut out as before.

Layer these stamped images as seen and using
papermania stickers I made the word 'number'
across the top.
I then used Anita's peel off 'buttons' on to various papers
and cut out then adhered to the card.

This card looks very dimensional, but is in fact
quite flat making this a great card to post.


8 May 2012

Papermania Stamps

Hot Diggity Dog Stamp used on the first card.

The image was stamped twice one left without being 
coloure the other was punched out with a 1½" scalloped
xcut punch and coloured to create the spotlight technique.
The first stamped image was cut out with a nesting die and the
punched circle had dimension pads on the back and layered
over the first image.

Boofle backing papers were then cut and
embossed with the patchwork embossing
folder.
Sentiment stamped and cut out with xcut dies and
Anita's ribbon threaded through.


John Bryers stamp of a Model T Ford Car stamped onto
polka dot paper using sepia versafine ink and highlighted
with a white gel pen.  Lightly distress the edges prior to
mat and layering on to orange card stock.

Computer sentiment cut using xcut dies and embossed in
the patchwork embossing folder.  Three boofle buttons
threaded with differing threads into bows added to finish.


A good male card!


2 May 2012

Distress Inked Cards

Using distress inks onto a smooth card at least three
colours to make the back ground.
Then I used a leaf stamp with light green distress ink over
the top to add more interest.
Pilkington tree stamps inked in forest green distress
ink and and white gel pen to highlight the light.


Sheen Douglass sentiment stamped in sepia versafine
and highlighted with a white gel pen. Mat and layered on
to a black DL card and orange organza ribbon with pearl
stones to finish.

The same method was used on the card below,
but stamped on to labels prior to sticking on to brown
card.  Corners punched from excess labels and polka
dot organza ribbon with metal effect pearls to finish.


Both cards are very simple to make.
Give it a go!

1 May 2012

Boofle Card


Boofle decoupage on birthday word.
This decoupage was layered using silicone and placed
on to a strip of fabric paper and Boofle backing papers mat
and layered.  Boofle ribbon place across with a ribbon from
same brand.  Three boofle buttons and a sentiment 'Happy' mat
and layered with fabric and black card stock to match.
All adhered to a DL cream card blank.